
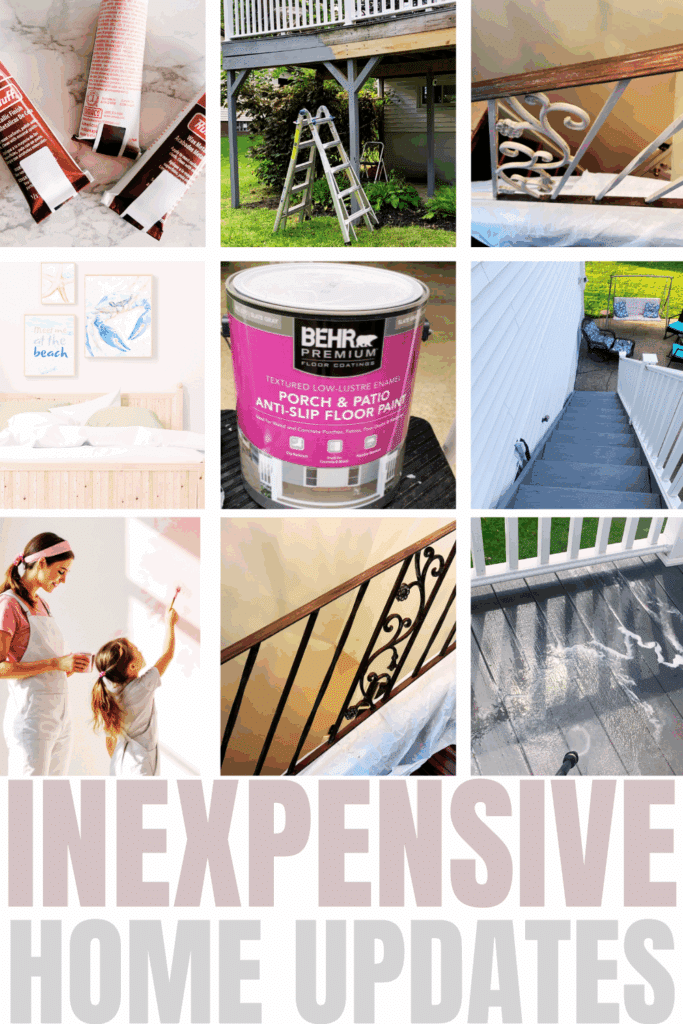
Are you ready to give your home a lift without breaking the bank? You’re in the right spot. If you’ve ever wished for a space that looks amazing but still feels like you, inexpensive home updates are your best friend. Keep reading to get your home upgraded on a budget today!
I may earn a small commission for affiliate links in this post at no extra cost to you. Please read my privacy policy and privacy page for more information. As an Amazon Associate, I earn from qualifying purchases.
When we first moved into our fixer upper home, I knew I wanted to create a home that felt warm, personal, and updated—without breaking the bank.
Over time, I’ve tackled one project after another, learning as I go and discovering so many budget-friendly ways to refresh each room.
From quick paint tricks to kitchen upgrade ideas to free printable wall art that make a big impact, I’ve found that it really is possible to transform your space with just a little time, creativity, and on a budget.
I’m so excited to share these easy and affordable home updates in one place for you!
Whether you’re looking to freshen up a tired room or just need a little inspiration to get started, I hope these ideas spark your imagination and show that you don’t need a big budget to make your home feel brand new.
Ready to update your home the cheap way? Great!
Grab a snack, settle in, and let’s find some inexpensive home updates perfect for your home!
Affordable Kitchen Upgrades: Quick Wins for a Big Impact

Kitchens have a magic way of drawing people in.
If you want your home to shine, start with where you cook, snack, and gather.
Even a few small changes can wake up your kitchen and help the whole place feel fresh.
You don’t need a giant budget to get big results, either.
Here’s how you can make fun, wallet-friendly updates that anyone can pull off—no contractor required.
Easy Kitchen Cabinet Painting Steps to Upgrade Your Home
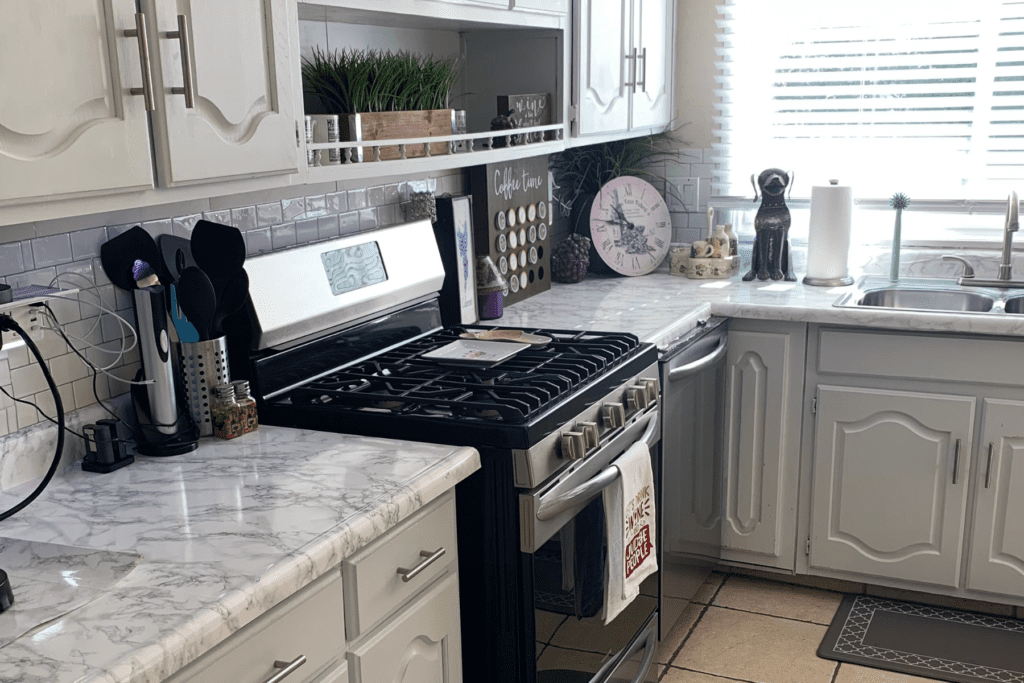
A coat of paint can work wonders.
Repainting old kitchen cabinets is the fastest way to make your kitchen feel brand new.
The trick? Keeping it simple and doing a little prep work up front.

Here’s a no-fuss way to paint your kitchen cabinets:
- Remove cabinet doors and hardware. Put screws and knobs in a bag so you don’t lose them.
- Wash down every door and surface. Catch all the grease with a mix of mild dish soap and water or Windex.
- Lightly sand cabinet surfaces. Aim for a smooth, dull finish so paint will stick.
- Wipe down with a tack cloth. This grabs all the dust you just made.
- Lay down drop cloths. Protect your floors and counters before painting.
- Grab an all in one kitchen cabinet paint kit. This has everything you need to paint your cabinets without priming.
- Brush or roll on cabinet paint. Pick a kitchen-friendly, washable finish.
- Add a second or third coat if necessary. This makes the color pop and hides any streaks.
- Let everything dry fully. At least a few hours (or overnight) between coats.
- Reattach hardware and rehang doors. Give handles and pulls a quick polish for bonus shine.
- Step back and admire. Instant kitchen glow!
You can change the whole look of your room for less than the cost of one fancy dinner.
Stick with colors you love, and you’ll never get tired of your kitchen makeover.
I chose Nuvo Titanium Infusion Cabinet Makeover Kit in Brilliant White as pictured above.
How to Install a Kitchen Peel and Stick Backsplash on a Budget
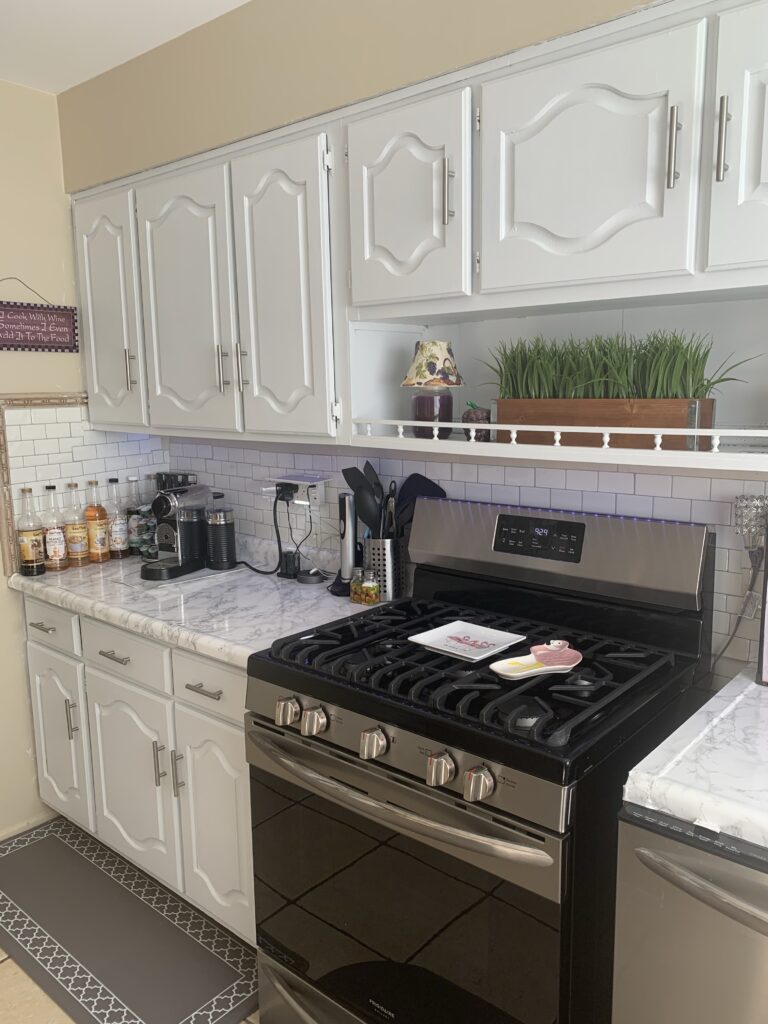
Peel-and-stick backsplash tiles are one of the best things to hit DIY kitchens.
They go up fast, look like real tile, and cost far less than you might think.

Ready to try it?
Here’s how to do it right:
- Clean your wall. Let it dry before you start.
- Measure and mark your area. Use a straight edge so your tiles line up perfectly.
- Cut tiles to fit. Use sharp scissors or a utility knife to trim for outlets and edges.
- Peel off backing. Take your time so the adhesive stays clean.
- Stick tiles to the wall. Press firmly so each tile is set.
- Smooth out bubbles by hand. A soft cloth or plastic smoother works great.
- Wipe off any dust. Enjoy your new “tiled” backsplash.
In an hour or two, you can give your kitchen a designer look for less than the cost of new cookware.
The best part? If you ever want a change, these tiles peel right off.
I used white subway peel-and-stick tiles in the pictures above.
Easy Steps to DIY Cheap Countertop Upgrade with Contact Paper

If you’re tired of looking at old countertops but a full replacement is out of reach, try a cheap countertop upgrade project with contact paper.
It’s waterproof, easy to clean, and comes in lots of fun patterns that mimic stone, marble, or wood.

Here’s how to get a smooth finish every time:
- Wipe down countertops and let dry.
- Measure and cut your contact paper. Leave a little extra for the edges.
- Peel back a few inches of the backing. Don’t peel off all at once!
- Line up your edge and press down slowly.
- Smooth as you go with a credit card or tool. This helps prevent air bubbles.
- Trim around sinks, stovetops, and corners. A craft knife makes sharp edges easy.
- Tuck edges underneath when possible. This keeps the look polished.
- Use hair dryer. This adheres the paper to the counter.
- Wipe down again, then enjoy your new countertop.
You’ll spend less than a pizza night and feel like you’ve got brand-new counters.
Repaint Kitchen Table and Chairs the Easy Way with These 12 Steps
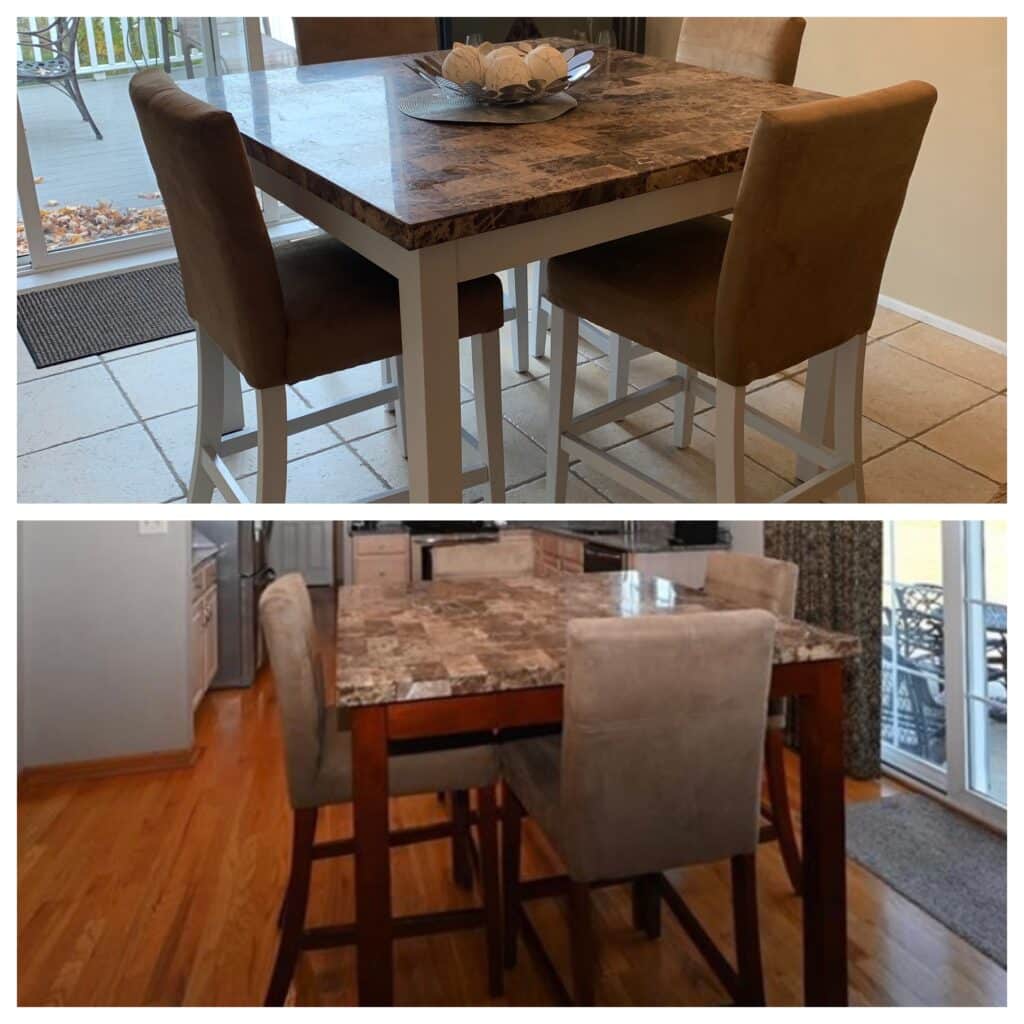
Dining sets take a beating, but you can give yours a second life with just a few supplies.
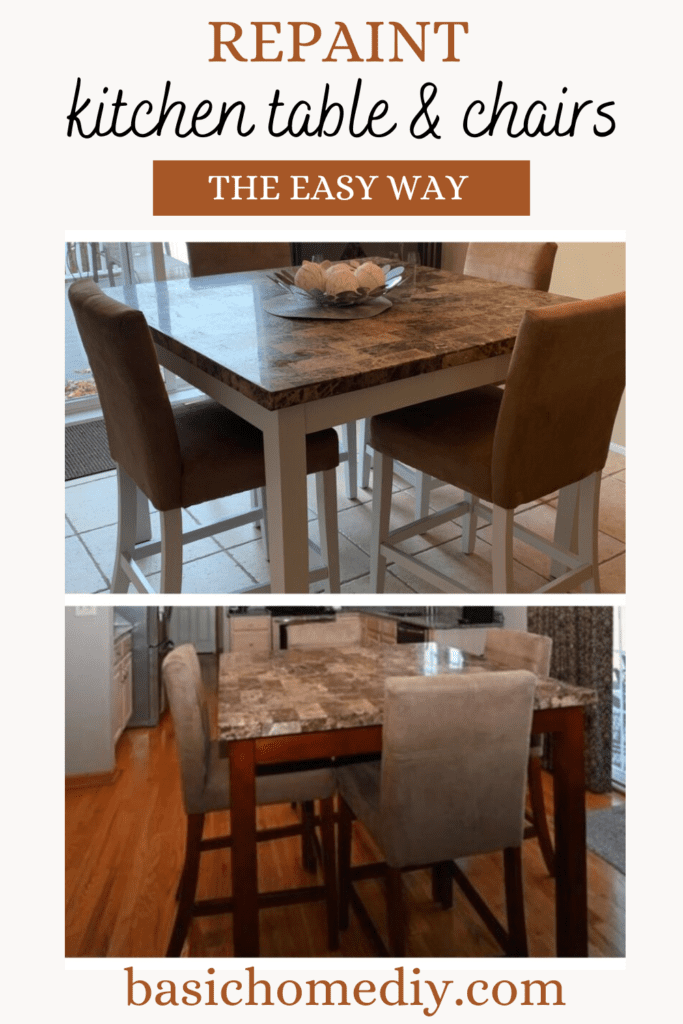
Grab your favorite color and follow these quick steps to repaint your kitchen table and chairs the easy way!
- Move your table and chairs to a well-ventilated spot.
- Wipe off any crumbs, grease, and sticky spots.
- Remove cushions or pads (if able) for easier painting.
- Sand any glossy surfaces lightly. Focus on legs, arms, and high-touch spots.
- Wipe with a damp cloth to remove dust.
- Lay down a drop cloth to protect your floors.
- Grab an all in one paint kit. This has everything you need to paint your cabinets without priming. I used the same as my kitchen cabinet painting project.
- Apply your first coat of paint. Use a foam brush for a streak-free finish.
- Let paint dry fully. Thin coats get the best results.
- Repeat for a second (or third) coat if needed.
- Reassemble cushions and set. Sit back and admire your work.
You’ll be amazed how new furniture instantly perks up the kitchen.
Play with colors, mix and match, or stick with one classic shade—you can’t go wrong.
Simple DIY Ideas to Refresh Any Room

Transforming your space doesn’t have to mean emptying your wallet or living in a construction zone.
When you want results fast, focus on projects you can do in a weekend or less, using what you already have or picking up a few supplies on a quick store run.
Paint, art, and playful decor can do wonders on a budget.
If you’re after updates that make every room feel lively and new, give these simple, inexpensive ideas a try.
Easy Tips to Refresh and Paint Metal Stair Railing

Metal stair railings set the tone for your entryway or hallway and, when they look worn, the whole space can feel tired.
You can refresh and paint old metal railings with a few easy steps.
No need to call in a pro or spend your savings on a brand new banister.

Here’s how to make it pop:
- Clean first. Use warm soapy water or a degreasing spray like Windex to strip away grime and oily fingerprints.
- Lightly sand the railing. Gently scuff the surface with fine-grit sandpaper so paint will bond.
- Wipe away dust. A damp cloth does the trick.
- Tape off nearby walls, stairs, and floors. This keeps your updates neat and stress-free.
- Apply Rub N’ Buff Paint. This paint is easy to work with and goes on with a unique look.
- Let it dry fully. Rushing will only cause uneven areas.
- Add two (or three) coats of paint.
- Remove tape and admire your work. You’ll feel like you installed a new staircase.
I used the Rub n Buff Wax Metallic Spanish Copper color in the above pictures.
Budget Printable Wall Art Ideas for Every Room in Your Home

Bare walls? No problem.
Printable wall art is the best-kept secret for quick, affordable decor.
You don’t have to hunt down expensive pieces or settle for store-bought prints that never feel quite right.
With the magic of printables, you pick the style, size and vibe.

Try these easy art upgrades:
- Grab free printable wall art or check out Etsy for some budget-friendly options, too.
- Mix and match. Print a gallery set—think botanicals, abstracts, or fruits. Group three to five prints in mismatched frames for instant style.
- Print at home or with a pro. For that crisp, gallery look, use thick, matte paper or order from a print shop.
- Switch art for the seasons. Change up your prints with fall leaves, spring florals, or playful summer watercolors.
- Go big with one oversized print. Many files are high-res and look great at poster size.
- Frame with creativity. Thrift frames, paint plain ones, or use washi tape for a creative touch.
You can create a custom look for every room, from the bathroom to the playroom, in less time than it takes to binge an episode of your favorite show.
Trendy Modern Wall Plants Decor Ideas for the Home

Bringing greenery inside instantly boosts your mood and your decor.
Wall plants pack a style punch in any room, especially when you try trendy new setups that go beyond old-school hanging pots.
Even if you don’t have a green thumb, faux options give the same energy for less fuss.

Here are some eye-catching ways to use plant decor on your walls:
- Floating planters: Mount small, geometric planters in clusters on your living room walls. Try succulents (real or fake) for an easy-care upgrade.
- Macrame plant hangers: Hang a few from decorative hooks near windows for a chill, boho touch.
- Wall-mounted propagation stations: Use glass tubes or jars to show off root growth from cuttings—it’s like science class, but stylish.
- Living plant frames: Buy or DIY a frame that holds a row of tiny potted herbs, perfect for the kitchen.
- Vertical faux greenery panels: Add a modern, dramatic look to a home office or bedroom with a square of faux greenery.
- Ledge shelves: Place potted trailing plants like pothos on a narrow ledge, letting vines spill down for a relaxed feel.
Even a single wall plant can wake up a blank space.
Spread small moments of green throughout your home for a fresh, welcoming vibe that lasts all year.
Benefits of Adding a Blob Mirror to Your Home
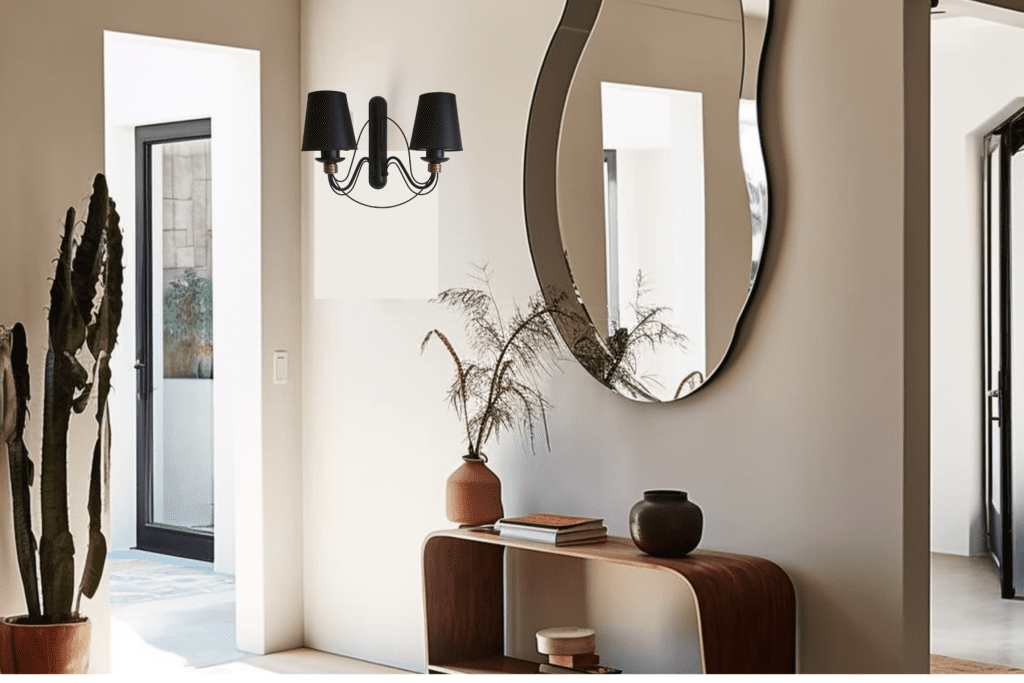
Blob mirrors (those wavy, organic-shaped pieces you see everywhere) have exploded in popularity because they instantly make a room feel fun and modern.
If you’re looking for a truly unique statement piece that won’t bust your budget, this is it.
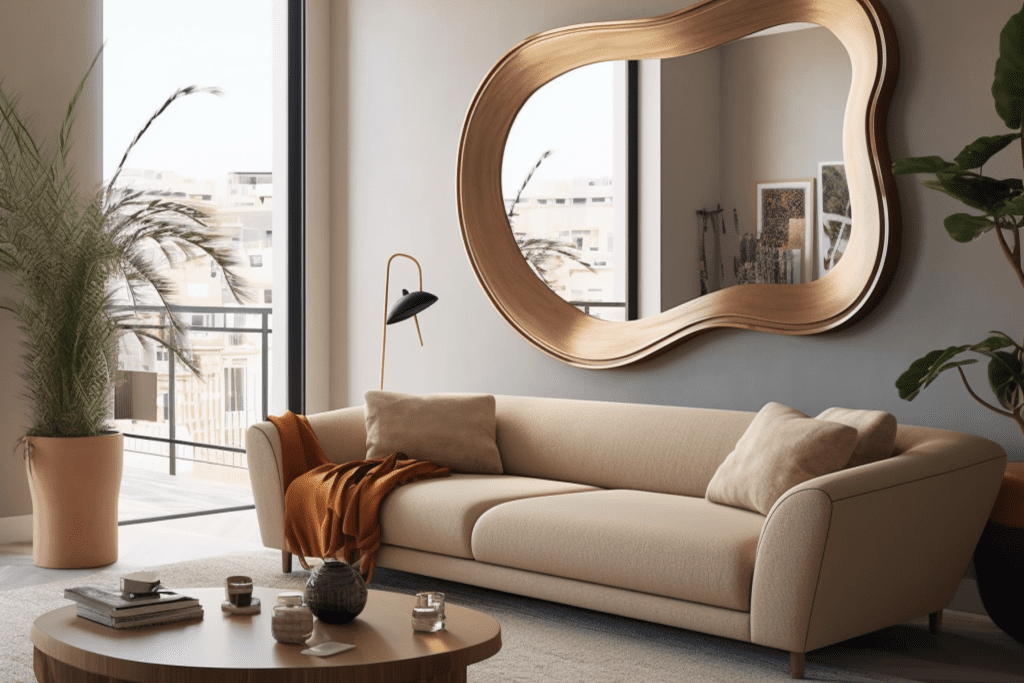
A blob mirror offers more than just good looks:
- Adds instant interest to bare walls where nothing else fits.
- Reflects and spreads natural light, making any room feel bigger and brighter.
- Creates playful, unique shapes that set your home apart.
- Pairs well with every decor style, from minimalist to maximalist.
- Easy to hang with simple adhesive strips or wall hooks.
- Mixes with other art to create a varied, gallery-style wall.
- Works in every room, from entryway to bathroom to kid’s rooms.
- Fun for selfies and photos, adding a quirky touch to daily life.
- Inexpensive compared to traditional framed mirrors or wall art.
- Lightweight and easy to move when you feel like rearranging.

A blob mirror is an easy ticket to feeling like your home is current and lively, not the same old space you’ve stared at for years.
Pair one with bold paint or fun art to boost your style even more.
Budget-Friendly Outdoor Upgrades for Curb Appeal
A fresh, tidy outdoor space draws the eye and makes your home feel welcoming from the very first glance.
You don’t need a huge budget to boost your curb appeal.
With some elbow grease and simple tools, you can turn a weathered deck or porch into a highlight of your home.
These quick, do-it-yourself ideas make your outdoor area clean, bright and ready for get-togethers or quiet mornings with coffee.
How to DIY Pressure Wash and Clean Your Deck
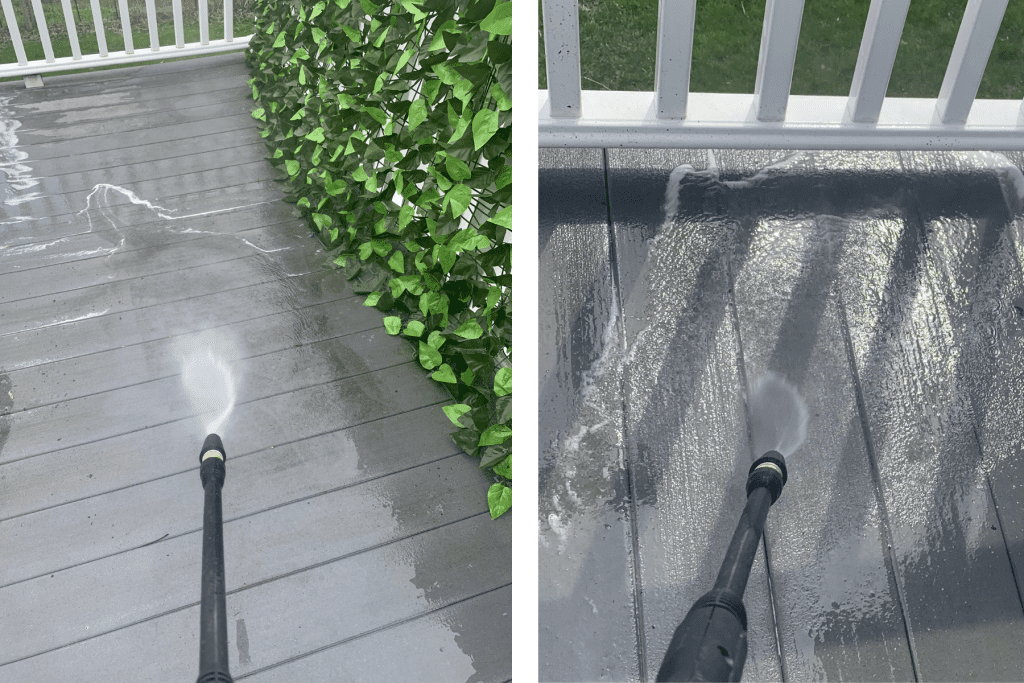
If your deck looks gritty, gray or just plain tired, a solid cleaning can reveal the wood’s real color and give everything a fresh start.
Pressure washing is a game changer for weathered decks, but you don’t have to own fancy gear.
You can borrow or rent one from a home improvement store.
Here’s how you can bring your deck back to life, step by step.
- Clear off the deck. Move furniture, planters and anything in the way.
- Sweep up dirt and leaves. Get in every corner so you don’t grind grit into the wood.
- Check for loose boards or nails. Hammer down popped nails and secure anything wobbly.
- Test your pressure washer. Practice on a scrap board or hidden spot so you avoid splintering or gouging the wood.
- Wet the whole deck with water only. This helps loosen stubborn dirt and stops cleaner from soaking in too fast.
- Spray deck cleaner if needed. Use a paint roller or spray bottle for even coverage. Let it sit for about 10 minutes, but don’t let it dry.
- Use the pressure washer on low to medium setting. Run the wand along the grain of the wood. Keep it moving to prevent any damage.
- Rinse well. Make sure all the cleaner is washed away. You don’t want any residue left behind.
- Let the deck dry fully. Usually overnight is enough before walking on it or moving your stuff back.
- Sweep or wipe away any remaining dust. This last step leaves everything looking extra sharp.
You’ll see instant results.
The wood will look lighter and newer right away.
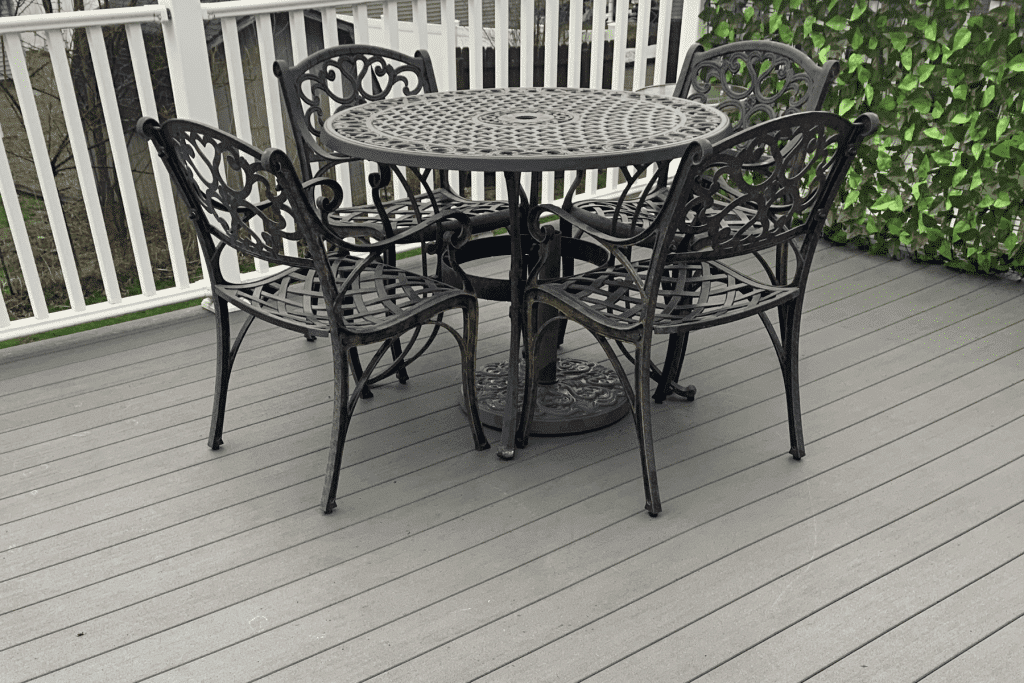
How to Refinish and Repaint Outdoor Decks in 12 Easy Steps
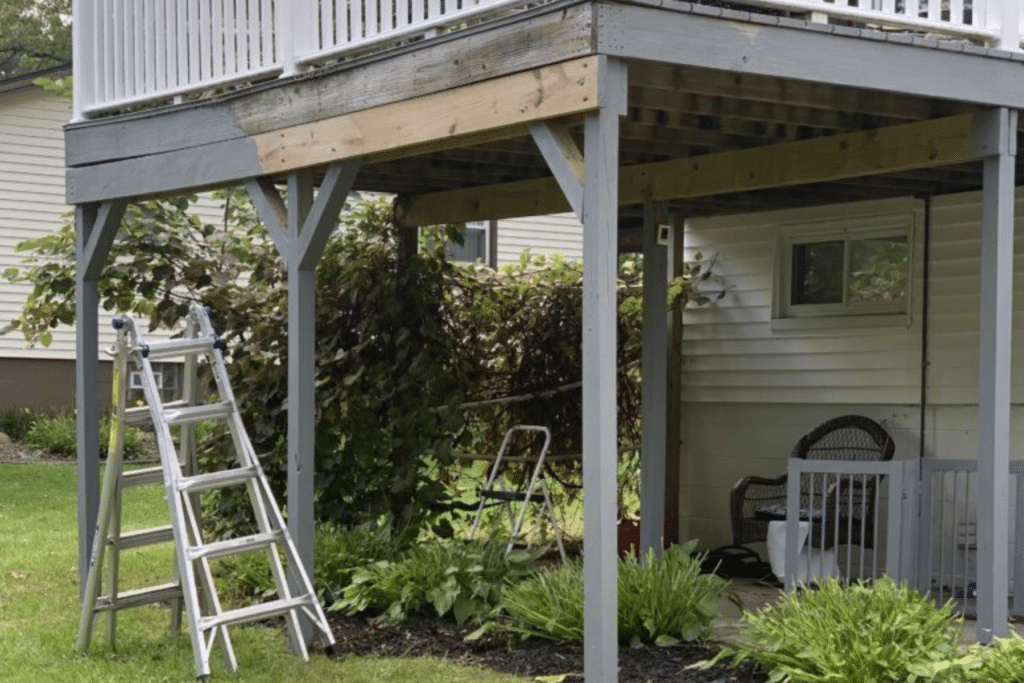
A faded deck can drag down your home’s look.
However, refinishing and repainting outdoor decks can bring it back to life.
You don’t need to hire a pro.
With a clear plan, some patience, and a few basic supplies, you can tackle this project on your own and see a huge transformation.
Follow these easy steps for a deck you’ll be proud to show off:
- Wait for dry weather. Sunshine and a dry forecast give the best results.
- Clean the deck. Use the pressure washing steps above or a stiff brush, depending on what you have.
- Fix any damage. Replace cracked boards and secure any loose nails or screws.
- Let the deck dry completely.
- Sand rough spots. Use a sanding pole or a hand sander to smooth splinters and bumpy areas.
- Sweep and wipe down again. Dust can get trapped under paint or stain.
- Choose your finish. Pick exterior deck paint for color, or stain for a natural wood look.
- Seal up cracks and gaps. Caulk any joints that need extra protection from water.
- Tape off nearby surfaces. Cover siding, steps, and anything you don’t want to paint or stain.
- Start painting or staining. Use a roller for flat spots and a brush for corners and railings.
- Let dry as directed. Check the label, but most products need at least a few hours.
- Apply a second (or third) coat if needed. This makes your deck tougher and ensures even coverage.
For best results, always work in sections.
Finish balusters and rails first, then move to the floorboards.
Stick with long, even strokes and don’t rush.
The payoff is a brand new look for the cost of a gallon or two of stain and a sunny afternoon.
Stylish Modern Touches That Look Expensive (But Aren’t)

Adding a sense of luxury to your home doesn’t have to be pricey or complicated.
Sometimes, just one modern detail can completely change the mood of a space, making your rooms feel on-trend and thoughtfully put together.
The trick is to find those details that pack a punch without draining your wallet.
These stylish, high-impact updates will impress guests and lift your own spirits every time you walk by.
Ready for a fresh look?
Here’s how to bring in touches that feel high-end on a real-life budget.
Stylish & Functional: The Hottest Modern Bathroom Faucets Right Now

Updating a bathroom faucet is one of those instant changes that gets attention.
You don’t need to spend a fortune to get that Instagram-worthy look, either.
Today’s modern faucets come in eye-catching finishes and playful shapes—all at prices you can smile about.
Plus, this update often takes less time than ordering takeout.

With so many fun features and finishes out there, it can feel tough to choose.
To help you decide, check out these hot trends in affordable bathroom faucets that look far more expensive than they are:
- Matte Black Everything: A matte black faucet adds drama and works with almost any style, from farmhouse to urban chic. It hides fingerprints better than shiny chrome, too, which is a perk when you want to spend less time cleaning.
- Brushed Brass or Gold: Warm brass or gold brings a pop of shine and looks luxe but playful, especially against plain white sinks or simple tile. You’ll find solid options at home stores and online for less than you might guess.
- Waterfall Spouts: A waterfall-style faucet feels spa-like and playful. Kids love them, and adults appreciate the sleek, sculptural lines. These come in finishes like nickel, chrome, or even bold colors.
- Single-Handle Simplicity: Choose a faucet with a single lever for that clean, modern look. Not only does it look cool, but it’s so much easier to use. No more juggling hot and cold at the same time.
- Geometric Shapes: Think squared-off bases, crisp angles, or round, chunky silhouettes. These fun shapes make the faucet itself a piece of decor, not just a tool in your morning routine.
- Satin Nickel: This classic finish keeps things light and works with wood, concrete, or colorful paint. It’s a great way to modernize without going ultra bold.
Sometimes a bit of stylish faucet upgrades is all your home needs to look its very best.

Final Thoughts
I hope you liked these inexpensive home updates and some of the ideas has sparked some new inspiration for your own home!
Every project I’ve shared came from a place of wanting to make the most of what I had—using creativity, a little elbow grease, and a lot of love to turn our fixer upper into a home that truly feels like us.
Whether you’re just starting your DIY journey or you’ve already tackled a few projects yourself, remember that you don’t need a huge budget to make meaningful changes.
Small updates can make a big difference!
Thanks so much for following along with my home improvement adventures.
Grab your free printable budget planner to get organzied with all your home improvement projects below!
Want more great DIY and everything home ideas? Be sure to follow us on Flipboard, Pinterest, Instagram, Facebook, and X for the latest posts, tips, and ideas.
Your Turn
If you’ve tried any budget-friendly updates of your own, I’d love to hear about them—feel free to drop a comment or connect with me on social! Let’s keep cheering each other on, one DIY at a time.
RELATED POSTS:
- Laundry Room Ideas That Add Style and Function On a Budget
- Cheap and Easy Kitchen Updates On a Budget That Make a Big Difference for Less
- 15 Genius Cleaning Declutter Organization Ideas
- Easy Tips to Get Organized with DIY Decluttering Quickly
- Smart DIY Water Bottle Storage and Organization Ideas
- Best Bathroom Organization Tips for Your Home


These are such amazing before and afters! I especially love the kitchen and the deck makeovers.
Loving these easy, inexpensive DIY home updates! It really makes a difference and makes the home feel fresh and new! Thanks for sharing.
These are such great ideas! I would love to update my home, but since I’m on a budget, I’m a bit limited. I am definitely going to need to go read your post about peel and stick tile. That’s something I’ve been seriously considering, but I’m worried it’s not going to be durable. Thanks so much for sharing!
I love this! I’m always looking for ways to freshen up the place!
This was a lovely list of inexpensive decor ideas. I love the blob mirrors. It adds a nice touch. I am now looking into getting one. Thanks for sharing
With the right tools, a bit of patience, and time, these inexpensive home updates can have you fixer-upper looking like a brand new home.
Hi Karen!
Yes, it’s so important to have all the right tools and patience with a fixer-upper home! I hope you found some inspiration with these DIY inexpensive home updates I’ve tried at my home.
Thanks for reading!
Debbie